
19 ກໍລະກົດ 2026
ວິທີສ້າງ CRUD ພື້ນຖານດ້ວຍ Laravel ສຳລັບຄົນເລີ່ມຕົ້ນ
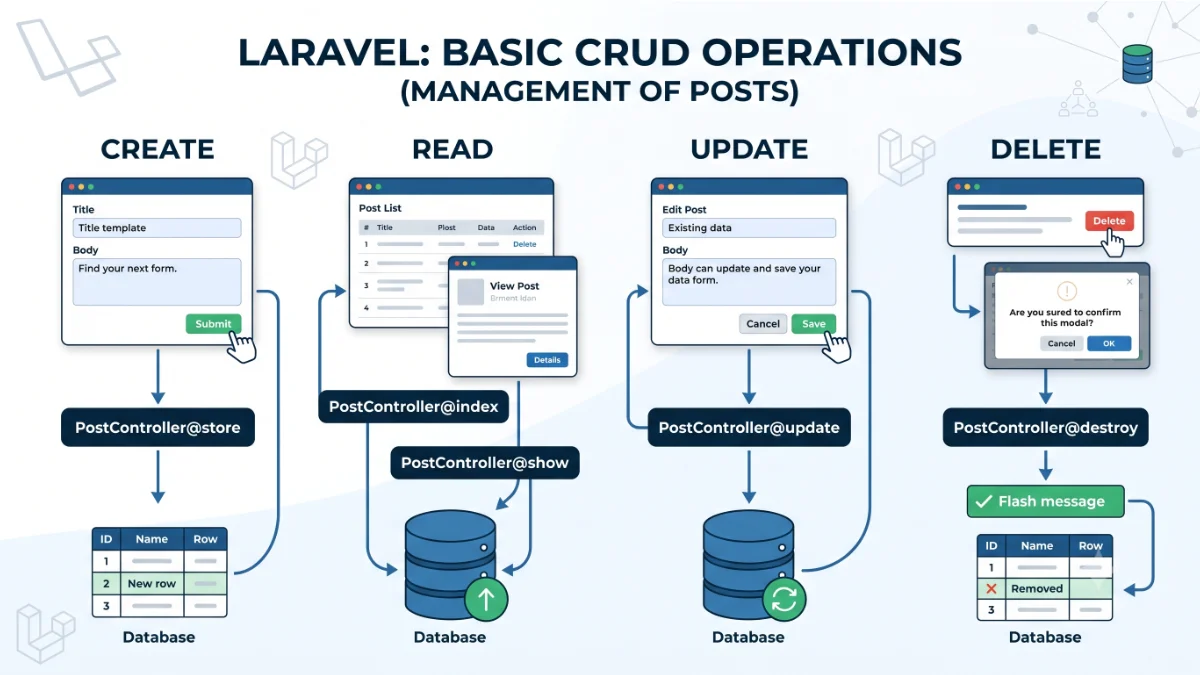
ບົດນຳ
CRUD ຄື 4 ການເຮັດວຽກພື້ນຖານທີ່ເກືອບທຸກລະບົບເວັບໄຊຕ້ອງມີ: Create (ສ້າງ), Read (ອ່ານ), Update (ແກ້ໄຂ), Delete (ລຶບ). ບົດຄວາມນີ້ຈະພາທ່ານສ້າງລະບົບ CRUD ພື້ນຖານສຳລັບຈັດການ "ບົດຄວາມ" (Post) ດ້ວຍ Laravel — ຕ້ອງມີ PHP ແລະ Composer ຕິດຕັ້ງໄວ້ໃນເຄື່ອງກ່ອນ.
1. ສ້າງ Model ແລະ Migration
ໃຊ້ Artisan command ສ້າງ Model ພ້ອມ Migration ໃນຄັ້ງດຽວ:
php artisan make:model Post -m
ເປີດໄຟລ໌ migration ທີ່ຢູ່ໃນ database/migrations/ ແລ້ວແກ້ໄຂ:
public function up(): void
{
    Schema::create('posts', function (Blueprint $table) {
        $table->id();
        $table->string('title');
        $table->text('body');
        $table->timestamps();
    });
}
ຈາກນັ້ນຮັນ migration ເພື່ອສ້າງຕາຕະລາງໃນຖານຂໍ້ມູນ:
php artisan migrate
$table->id() ສ້າງ column id ແບບ auto-increment ອັດຕະໂນມັດ, $table->timestamps() ສ້າງ column created_at/updated_at ໃຫ້ອັດຕະໂນມັດ ບໍ່ຕ້ອງຂຽນເອງ.
2. ສ້າງ Controller
ໃຊ້ --resource ໃຫ້ Artisan ສ້າງ method CRUD ທັງໝົດໃຫ້ອັດຕະໂນມັດ:
php artisan make:controller PostController --resource --model=Post
ເປີດ app/Http/Controllers/PostController.php ແລ້ວແກ້ໄຂ method ຫຼັກ:
public function index()
{
    $posts = Post::latest()->get();
    return view('posts.index', compact('posts'));
}

public function store(Request $request)
{
    $request->validate([
        'title' => 'required|max:255',
        'body' => 'required',
    ]);

    Post::create($request->only('title', 'body'));
    return redirect()->route('posts.index')->with('success', 'ສ້າງບົດຄວາມສຳເລັດ');
}

public function update(Request $request, Post $post)
{
    $request->validate([
        'title' => 'required|max:255',
        'body' => 'required',
    ]);

    $post->update($request->only('title', 'body'));
    return redirect()->route('posts.index')->with('success', 'ແກ້ໄຂສຳເລັດ');
}

public function destroy(Post $post)
{
    $post->delete();
    return redirect()->route('posts.index')->with('success', 'ລຶບສຳເລັດ');
}
Post::create($request->only('title', 'body')) ໃຊ້ Mass Assignment — ຕ້ອງເພີ່ມ protected $fillable = ['title', 'body']; ໃນ app/Models/Post.php ກ່ອນ ບໍ່ດັ່ງນັ້ນ Laravel ຈະ block ການບັນທຶກ (ເປັນ security feature ປ້ອງກັນ column ທີ່ບໍ່ຕ້ອງການຖືກແກ້ໄຂ).
3. ຕັ້ງ Route ແບບ Resource
ເປີດ routes/web.php ແລ້ວເພີ່ມແຖວດຽວ ແທນທີ່ຈະຂຽນ route ທຸກອັນແຍກກັນ:
use App\Http\Controllers\PostController;

Route::resource('posts', PostController::class);
ແຖວດຽວນີ້ ສ້າງ route ໃຫ້ຄົບທັງ 7 ອັນ (index, create, store, show, edit, update, destroy) ອັດຕະໂນມັດ — ກວດເບິ່ງລາຍຊື່ທັງໝົດໄດ້ດ້ວຍ php artisan route:list.
4. ສ້າງໜ້າ View ດ້ວຍ Blade
ສ້າງໄຟລ໌ resources/views/posts/index.blade.php:
@extends('layouts.app')

@section('content')
    <h1>ລາຍການບົດຄວາມ</h1>

    @if(session('success'))
        <p>{{ session('success') }}</p>
    @endif

    @foreach($posts as $post)
        <div>
            <h3>{{ $post->title }}</h3>
            <p>{{ $post->body }}</p>

            <form action="{{ route('posts.destroy', $post) }}" method="POST">
                @csrf
                @method('DELETE')
                <button type="submit">ລຶບ</button>
            </form>
        </div>
    @endforeach
@endsection
@csrf ຈຳເປັນຕ້ອງໃສ່ໃນທຸກ form ທີ່ສົ່ງຂໍ້ມູນ (POST/PUT/DELETE) — Laravel ໃຊ້ຕົວນີ້ປ້ອງກັນການໂຈມຕີແບບ CSRF, ຖ້າລືມໃສ່ຈະຂຶ້ນ error 419 Page Expired. ສ່ວນ @method('DELETE') ຈຳເປັນເພາະ HTML form ຮອງຮັບພຽງ GET/POST ໂດຍກົງ, Laravel ຕ້ອງ "ຈຳລອງ" HTTP method ອື່ນຜ່ານ hidden field ນີ້.
ສະຫຼຸບ
ຕອນນີ້ທ່ານໄດ້ລະບົບ CRUD ພື້ນຖານທີ່ໃຊ້ງານໄດ້ຈິງແລ້ວ — Laravel ຊ່ວຍຫຍໍ້ຂັ້ນຕອນທີ່ຊ້ຳກັນ (routing, validation, mass assignment) ໃຫ້ຂຽນ code ໜ້ອຍລົງຫຼາຍທຽບກັບ PHP ທຳມະດາ. ຂັ້ນຕອນຕໍ່ໄປທີ່ຄວນສຶກສາ ຄື Form Request Validation (ແຍກ validation logic ອອກຈາກ Controller) ແລະ Eloquent Relationships ຖ້າຢາກເຊື່ອມ Post ກັບ User ຫຼື Category.